In my previous post (Continuous Testing In VSO using Selenium), I’ve shown how to create a build definition in VSO for continuous and simultaneous UX automation testing. I’ve also shown how to use various configuration files to set browser specific testing without the use of other tools to set config values in runtime.
With more and more companies, organizations and/or IT departments speeding up their development process, an important goal in mind is for frequent changes to be deployed immediately on intermediate environments (Dev/Test) then finally to production. This is what we call Continuous Delivery/Deployment. A process wherein changes gets deployed to intermediate environments with certain quality gates (automated tests) that eventually end up to production.
VSO offers “Release Manager” that targets continuous deployment. I’ll focus on the basic principles of continuous deployment then I strongly suggest taking these steps to the next level by innovating around quality gates (further automated tests).
Automated Tests:
In this post, I’ll simply create a test project that uses Selenium UX framework to run tests. Also, in the same test project, I’ll introduce Data Driven Tests to run all our browsers. I suggest referencing my previous post around Continuous Testing. I’ve provided sample code in that post that allows you to create multiple instances of browser webdriver by passing in a parameter (OpenBrowser<T>). It’s helpful in this case when we use data driven testing. I’ve used data driven tests to trigger which browsers to run.
NOTE: If you’re not familiar on using Selenium to run automated UX testing, see these samples: http://docs.seleniumhq.org/docs/03_webdriver.jsp
[DataSource("Microsoft.VisualStudio.TestTools.DataSource.CSV", "|DataDirectory|\\Data\\Browser.csv", "Browser#csv",
            DataAccessMethod.Sequential),
            DeploymentItem(@"Data\Browser.csv", "Data"),
            DeploymentItem("phantomjs.exe"),
            DeploymentItem("chromedriver.exe"),
            DeploymentItem("IEDriverserver.exe"),
            TestCategory("BVTs"),
            TestMethod]

        public void ValidateHomePage()
        {
            var browserstring = TestContext.DataRow["Browser"].ToString();
            Trace.TraceInformation($"Test Ran on {browserstring}");
            BrowserType browsertype;
            if (!Enum.TryParse<BrowserType>(browserstring, out browsertype))
                throw new Exception($"{TestContext.DataRow["Browser"].ToString()} is not valid member of enumeration MyEnum");
            var driver = HttpWebHelper.OpenBrowser<IWebDriver>(browsertype);
            driver.Navigate().GoToUrl(new Uri("http://<some URL/"));
            Assert.IsTrue(driver.PageSource.Contains("Quality Engineering"));
        }
Note this test method focuses on the following areas:
Data Driven Tests – In my sample, I use a CSV file to host the browsers that I’m going to execute. In this case, the contents of the CSV file has 1 column (Browser) with four rows: Chrome, IExplore, FireFox, Headless (which is phantomJs). For more information on Data Driven Testing in C#, see the following:
How To: Create a Data-Driven Unit Test
https://msdn.microsoft.com/en-us/library/ms182527.aspx
The test itself launches the page and one way to verify once the deployment succeeded is to check if the home page launched with certain text on the page source.
Selenium Dependencies. Make sure that part of your deployment files include all appropriate selenium drivers for your browser tests. Without the drivers, tests will fail to execute on remote machines. I would also take a look at this article to make sure that you properly deploy your dependencies as part of the execution process.
DeploymentItemAttribute Class
When executed and successfully passing, you see the following results:
Build Definition:
While you may have your app building appropriately with associated tests (in my case a Web App hosted on Azure), it’s important that you properly define your build definition (tasks) with the proper deployment and test files.
For an overview of how VSO Build works, see this documentation:
https://msdn.microsoft.com/Library/vs/alm/Build/overview
There are 4 essential tasks that you need to define when creating your web app build definition
1) Build your web application with the deployments files. This step is important when configuring Release Manager
The key here is passing the MSBuild Arguments:
/p:DeployOnBuild=true /p:WebPublishMethod=Package /p:PackageAsSingleFile=true /p:SkipInvalidConfigurations=true /p:PackageLocation=”$(build.stagingDirectory)\QESite.zip”
The arguments supplied here is a way to generate your deployment files for your webapplication. The /p:PackageLocation is where you save your deployment files to (in a form of a zip file).
2) Publishing your deployment files for later use in Release Manager
The artifact name is the location where Release Manager will grab the deployment files from.
3) Publishing your test files for Release Manager to use
Take note of the contents structure.
**\QualityEngineeringSite.Tests\bin\**\*.dll – This will take all DLLs that in QualityEngineeringSite.Tests project.
**\bin\**\*.exe – Take anything that’s an executable (all selenium webdrivers)
**\bin\**\Data\*.csv – Take anything that’s a .csv (data files for testing)
4) Trigger the build for Continuous Integration. Anytime a commit/push has been executed on your branch (we’re using GIT for our source control) a build will automatically be triggered.
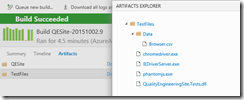
Once you have a successful build, you should see the following output:
Release Manager (putting both Test and Build together to form continuous deployment)
There are lots of documentation out in MSDN that specifically walks you through on Release Manager. I’m not going to focus much on this rather plug-in the pieces to have continuous delivery working for my web application.
For more information on release manager, see:
Understanding Release Management
https://msdn.microsoft.com/Library/vs/alm/Release/getting-started/understand-rm
Essential Tasks in Release Manager:
1) Create your Environments:
Depending on your needs, you have control of which environments you want to enable Continuous Deployment. For the purpose of my post, I used a Dev -> Test -> Prod work-flow model utilizing PaaS on Azure.
First Step:
Azure Web App Deployment:
Azure Subscription
It’s important for you to ensure that you manage your azure subscription correctly. You can have different azure subscriptions per environment. Each build step for an environment however requires that you only use 1 azure subscription. This subscription hosts the web application that you’re trying to deploy to.
An Example would be that your Dev or Test environment would use a different azure subscription while your Production environment uses a different subscription.
For more information on managing azure subscriptions in VSO, see the following article:
Create an Azure Service Endpoint
https://msdn.microsoft.com/Library/vs/alm/Release/getting-started/deploy-to-azure#createazurecon
Web App Name
This is essentially your http://webappname.azurewebsites.net
Web Deploy Package
This is the location where you point the location for your deployment files. It’s important to point specifically to the artifact name. In this case QESite.zip
Second Step:
Visual Studio Test
This is pretty straightforward step. You will basically ensure that any test project dlls will be executed. In this case, this is coming from the Test Artifacts that you’ve built in the build definition
2) Artifacts
Once you select the build definition field. Release Manager will automatically sense the artifacts associated with that build.
3) Triggers
It’s important that you select the box for Continuous Deployment. After all, this is what we want to achieve. Any new build that gets triggered from your build definition will now trigger your deployment for the environments specified.
Trigger a Continuous Deployment.
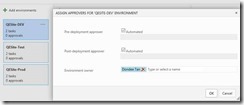
Kicking off a Release. Normally, I would assign an “Approver” before deploying to Test and Prod but for the purpose of this post, I’ve skipped this capability.
I just made a change from 3.0.0.0 to 3.0.0.1. Once I committed the code to the server, a build was triggered (from my CI in build definition). Upon successful build, it kicked off a release deployment.
Tests also passed on Dev and now continuous to deploy to both Test and Prod environments:
Deployment Succeeded.
Deployment Failure
In an event that a deployment failed in one of your environments (likely due to a failing test), the deployment process will stop at the point of failure. In my case, the Dev environment. Both Test and Prod are left untouched.
The logs provide you further information about the failure:
APPROVING A RELEASE.
This by far is one of the key capabilities why I/we chose to use release manager. Imagine a scenario where you want to have specific set of people managing your deployments “or” key people approving deployments. For each release step or phase, you can assign an approver before or after it proceeds to the next step.
Once you’ve appropriately assigned an approver, that person would need to approve the request as shown below:
Once approved, the next step will proceed.


