.Net Core – Creating Docker Containers in Azure DevOps using private Nuget Feeds

I recently ran into an issue where some our .Net Core apps have private nuget feed dependencies to both external and internal libraries. When you build apps in Azure DevOps, by default, access to private feeds stored in Azure DevOps already has a bearer token throughout the life of the pipeline in runtime. If you want to explore on the bearer token, it’s deeply discussed here: Predefined variables in Azure DevOps

Once a docker image has been pulled, the context of building an app within the image is restricted within the image context. To fix the issue, Microsoft has developed an azure artifacts credential provider that allows users to set security context in runtime via dotnet.exe or nuget.exe. The creds provider (shortened) is fully documented here.

Essentially, the steps involved are:

  1. Installing Credential Provider inside the docker container
  2. Setting the credentials in runtime via an environment variable within the docker container. VSS_NUGET_EXTERNAL_FEED_ENDPOINTS
  3. Passing a personal access token (PAT) created in Azure DevOps during docker build invocation

Prior to this, I was merely compiling the code outside of the container given that private feeds are authorized in the pipeline context then I simply copying the compiled bits over in the container. This, works, but… not a good pattern.

Installing Credential Provider inside the docker container

For this example, we use a nuget.config file to specify all nuget sources that hosts internal nuget packages. The .net cli (dotnet.exe) supports passing source location endpoints during execution so you don’t necessarily need to have a nuget.config file.

dotnet build --source c:\packages\mypackages

However, for ease of development, I prefer using nuget.config to specify nuget feed endpoints. This way, anyone who works on the same codebase doesn’t have to keep passing nuget source endpoints.

Linux Containers: https://github.com/microsoft/artifacts-credprovider/blob/master/helpers/installcredprovider.sh

# Docker Build Arguments
ARG PAT

RUN apt-get update && apt-get install -y locales
RUN sed -i -e 's/# en_US.UTF-8 UTF-8/en_US.UTF-8 UTF-8/' /etc/locale.gen && dpkg-reconfigure --frontend=noninteractive locales && update-locale LANG=en_US.UTF-8
ENV LANG en_US.UTF-8
ENV LC_ALL=en_US.UTF-8

RUN wget -qO- https://raw.githubusercontent.com/Microsoft/artifacts-credprovider/master/helpers/installcredprovider.sh | bash

ENV NUGET_CREDENTIALPROVIDER_SESSIONTOKENCACHE_ENABLED true
ENV VSS_NUGET_EXTERNAL_FEED_ENDPOINTS {\"endpointCredentials\": [{\"endpoint\":\"https://MyADOInstance.pkgs.visualstudio.com/_packaging/InternalNugetFeed/nuget/v3/index.json\", \"username\":\"build\", \"password\":\"${PAT}\"}]}

Windows Containers: https://github.com/microsoft/artifacts-credprovider/blob/master/helpers/installcredprovider.ps1

# Docker Build Arguments
ARG PAT

# This is specified here: https://github.com/microsoft/artifacts-credprovider
RUN xcopy "Utilities\credsprovider" "%userprofile%\.nuget\plugins" /E /I

ENV NUGET_CREDENTIALPROVIDER_SESSIONTOKENCACHE_ENABLED true
ENV VSS_NUGET_EXTERNAL_FEED_ENDPOINTS {\"endpointCredentials\": [{\"endpoint\":\"https://MyADOInstance.pkgs.visualstudio.com/_packaging/InternalNugetFeed/nuget/v3/index.json\", \"username\":\"build\", \"password\":\"${PAT}\"}]}

I’ve intentionally wrote the docker file for Windows containers to xcopy bits from my source to the image container nuget directory.  Why? All we’re doing here is simply copying the bits over to the plug-ins directory of the user profile running the build instance. This is also the same for Linux containers. The difference is that we can simply invoke the bash and powershell scripts within the container and execute during run-time.

Setting the credentials in runtime via an environment variable within the docker container

Overview of environment variables used:

NUGET_CREDENTIALPROVIDER_SESSIONTOKENCACHE_ENABLED:  Controls whether or not the session token is saved to disk. If false, the Credential Provider will prompt for auth every time.

VSS_NUGET_EXTERNAL_FEED_ENDPOINTS: Json that contains an array of service endpoints, usernames and access tokens to authenticate endpoints in nuget.config

${PAT}: is an argument variable that is passed during docker build. This is your personal access token created in Azure Devops.

{\"endpointCredentials\": [{\"endpoint\":\"https://MyADOInstance.pkgs.visualstudio.com/_packaging/InternalNugetFeed/nuget/v3/index.json\", \"username\":\"build\", \"password\":\"${PAT}\"}]}

The JSon file above sets the authentication scheme for the nuget feed endpoint specified in the nuget.config file. Ensure that both feeds match.

Passing a personal access token (PAT) created in Azure DevOps during docker build invocation

For this post, I’m utilizing new Azure DevOps pipeline capabilities. In this case, YAML pipelines. For more information, see my previous post on: YAML Builds in Azure DevOps – A Continuous Integration Scenario.

There are lots of ways to implement secure tokens in Azure DevOps. You really don’t want to expose tokens in clear text as part of your YAML file 😊. The most simplistic scenario is to declare a variable in your pipeline, encrypt it then use it within your pipeline.  See example below:

To pass the encrypted value during docker build:

docker build -f $(DockerFile) -t $(DockerImageEndpoint) ${DockerAppPath} --build-arg PAT=$(AzureDevOpsPAT)

$(AzureDevOpsPAT): Encrypted value declared at the pipeline.

A pipeline result would look something like this when implemented correctly:

YAML Builds in Azure DevOps – A Continuous Integration Scenario

Azure DevOps has released YAML builds. Truthfully, I’m very excited about this. YAML builds greatly changes the landscape of DevOps practices on both CI and CD forefront. At least as of writing of this post, Microsoft has full support on YAML builds.

YAML Based Builds through Azure DevOps

Azure DevOps, particularly the build portion of the service, really encourages using YAML. You can tell this by creating a new build definition and the first option under templates is YAML. However, if you’re like me and were used to the UI, or you’re just completely new to Azure DevOps, it could be a bit confusing. In a nutshell, here’s a very simple comparison why I encourage using YAML builds:

NON YAML Based Builds (UI Generated and Managed):

  • JSON Based
  • Not Focused on “Build as Code”
  • No source control versioning
  • Shared steps require more management in different projects
  • Very UI driven and once created, the challenge is to validate changes made (without proper versioning)

YAML Based Builds (Code Based Syntax):

  • Modern way of managing builds that’s common in open source community
  • Focused on “Build as Code” since it’s part of the Application Git Branch
  • Shared Steps and Templates across different repo’s. It’s easier to centralize common steps such as Quality, Security and other utility jobs.
  • Version Control!!! If you have a big team, you don’t want to keep creating builds for your branch strategy. The build itself is also branched
  • Keeps the developer in the same experience.
  • A step towards “Documentation As Code”. Yes, we can use Comments!!!

For more info on Azure DevOps YAML builds, see: Azure DevOps YAML Schema

For YAML specific information, see the following:
https://yaml.org/

Better Read: Relation to JSON:
https://yaml.org/spec/1.2/spec.html#id2759572

YAML’s indentation-based scoping makes ideal for programmers (comments, references, etc.…)

In this post, I’ll provide some sample build YAMLs towards a CI pipeline from developer’s perspective. Platforms used:

  • Application Development Framework – .Net Core 2.2
  • Hosting Environment – Docker Container

The web application is a simple Web API that is used to listen on Azure DevOps service hook events. There are associated Unit Tests that validates changes on the API so a typical process would comprise of:

  1. Build the application
  2. Run quality checks against the application (Unit tests, Code Coverage thresholds, etc…)
  3. If successfully, publish the appropriate artifacts to be used in the next phase (CD – Continuous Deployment)

Taking the above context, we’ll be:

  1. Building the .Net Core Web API (DotNetCoreBuildAndPublish.yml)
  2. Run Quality Checks against the Web Api (DotNetCoreQualitySteps.yml)
  3. Create a Docker Container for the Web Api (DockerBuildAndPublish.yml)

Job 1: Building the .Net Core Web API

parameters:
  Name: ''
  BuildConfiguration: ''
  ProjectFile: ''  

steps:
- task: DotNetCoreCLI@2
  displayName: 'Restore DotNet Core Project'
  inputs:
    command: restore
    projects: ${{ parameters.ProjectFile}}

- task: DotNetCoreCLI@2
  displayName: 'Build DotNet Core Project'
  inputs:
    projects: ${{ parameters.ProjectFile}}
    arguments: '--configuration ${{ parameters.BuildConfiguration }}'
    
- task: DotNetCoreCLI@2
  displayName: 'Publish DotNet Core Artifacts'
  inputs:
    command: publish
    publishWebProjects: false
    projects: ${{ parameters.ProjectFile}}
    arguments: '--configuration ${{ parameters.BuildConfiguration }} --output $(build.artifactstagingdirectory)'
    zipAfterPublish: True

- task: PublishBuildArtifacts@1
  displayName: 'Publish Artifact'
  inputs:
    PathtoPublish: '$(build.artifactstagingdirectory)'
    ArtifactName: ${{ parameters.name }}_Package
  condition: succeededOrFailed()

This YAML is straightforward, it uses Azure DevOps tasks to call .Net Core CLI and passes CLI arguments such as restore and publish. This is the most basic YAML for a .Net Core app. Also, notice the parameters section? These are the parameters needed to be passed by the calling app (Up Stream Pipeline)

CHEAT!!! So, if you’re also new to YAML builds, Microsoft has made it easier to transition from JSON to YAML. Navigate to an existing build definition, click on the job level node (not steps) then click on “View As YAML”. This literally takes all your build steps and translates them into YAML format. Moving forward, use this feature and set parameters for shared your YAML steps.

Job 2: Run Quality Checks against the Web Api

This job essentially executes any quality checks for the application. In this case both Unit Test and Code Coverage Thresholds. Again, calling existing pre-build tasks available in Azure DevOps

parameters:
  Name: ''
  BuildConfiguration: ''
  TestProjectFile: ''
  CoverageThreshold: ''

steps:
- task: DotNetCoreCLI@2
  displayName: 'Restore DotNet Test Project Files'
  inputs:
    command: restore
    projects: ${{ parameters.TestProjectFile}}

- task: DotNetCoreCLI@2
  displayName: 'Test DotNet Core Project'
  inputs:
    command: test
    projects: ${{ parameters.TestProjectFile}}
    arguments: '--configuration ${{ parameters.BuildConfiguration }} --collect "Code coverage"'

- task: mspremier.BuildQualityChecks.QualityChecks-task.BuildQualityChecks@5
  displayName: 'Checke Code Coverage'
  inputs:
    checkCoverage: true
    coverageFailOption: fixed
    coverageThreshold: ${{ parameters.CoverageThreshold }}

Job 3: Create a Docker Container for the Web Api

parameters:
  Name: ''
  dockerimagename: ''
  dockeridacr: '' #ACR Admin User
  dockerpasswordacr: '' #ACR Admin Password
  dockeracr: ''
  dockerapppath: ''
  dockerfile: ''
  

steps:    
- powershell: |
    # Get Build Date Variable if need be
    $date=$(Get-Date -Format "yyyyMMdd");
    Write-Host "##vso[task.setvariable variable=builddate]$date"

    # Set branchname to lower case because of docker repo standards or it will error out
    $branchname= $env:sourcebranchname.ToLower();
    Write-Host "##vso[task.setvariable variable=sourcebranch]$branchname"

    # Set docker tag from build definition name: $(Date:yyyyMMdd)$(Rev:.r)
    $buildnamesplit = $env:buildname.Split("_")
    $dateandrevid = $buildnamesplit[2]
    Write-Host "##vso[task.setvariable variable=DockerTag]$dateandrevid"
  displayName: 'Powershell Set Environment Variables for Docker Tag and Branch Repo Name'
  env:
    sourcebranchname: '$(Build.SourceBranchName)' # Used to specify Docker Image Repo
    buildname: '$(Build.BuildNumber)' # The name of the completed build which is defined above the upstream YAML file (main yaml file calling templates)

- script: |
      docker build -f ${{ parameters.dockerfile }} -t ${{ parameters.dockeracr }}.azurecr.io/${{ parameters.dockerimagename }}$(sourcebranch):$(DockerTag) ${{ parameters.dockerapppath }}
      docker login -u ${{ parameters.dockeridacr }} -p ${{ parameters.dockerpasswordacr }} ${{ parameters.dockeracr }}.azurecr.io 
      docker push ${{ parameters.dockeracr }}.azurecr.io/${{ parameters.dockerimagename }}$(sourcebranch):$(DockerTag)
  displayName: 'Builds Docker App - Login - Then Pushes to ACR'

This the last job for our demo. Once Quality check passes, we essentially build a docker image and upload it to a container registry. In this case, I’m using an Azure Container Registry.

This is an interesting YAML. I’ve intentionally not used pre-built tasks from Azure DevOps to illustrate YAML capabilities by using external command sets such as Power Shell (which works across platforms) and inline script commands such as docker

First things first, docker when creating images and tags is very case sensitive. Docker has strict naming conventions and one of them is that all tags and images should be lower case. Let’s dissect these steps:

Powershell Step: I’ve added some logic here to get built-in variables from Azure DevOps build definitions. Notice that I’ve binded sourcebranchname and buildname as an environment variable from Azure DevOps built-in

I’ve added some logic here to get built-in variables from Azure DevOps build definitions. Notice that I’ve binded sourcebranchname and buildname as an environment variable from Azure DevOps built-in

'$(Build.SourceBranchName)' # Used to specify Docker Image Repo
'$(Build.BuildNumber)' # The name of the completed build which is defined above the upstream YAML file (main yaml file calling templates)

What’s next is straightforward for you “DevOps practitioners” 🙂

$branchname= $env:sourcebranchname.ToLower();

The above line is the step where I use powershell to set the branchname to all lowercase. I will use it later when calling docker commands to create and publish docker images

$buildnamesplit = $env:buildname.Split("_")
$dateandrevid = $buildnamesplit[2]

The above line is dependent on what you define as your build definition name. I used the last part of the build definition at the docker tag.

name: $(Build.DefinitionName)_$(Build.SourceBranchName)_$(Date:yyyyMMdd)$(Rev:.r)
e.g.: #Webhooks-BuildEvents-YAML_FeatureB_20190417.4

Webhooks-BuildEvents-YAML – BuildName
FeatureB – BranchName
20190417.4 – Date/Rev (Used as the Docker Tag) 

You will see this build definition name defined in our upstream pipeline. Meaning, the main build YAML file that calls all these templates.

Script Step: Pretty straightforward as well. We invoke inline docker commands to: Build, Login and Push a docker image to a registry (ACR in this case). Notice this line though:

docker build -f ${{ parameters.dockerfile }} -t ${{ parameters.dockeracr }}.azurecr.io/${{ parameters.dockerimagename }}$(sourcebranch):$(DockerTag) ${{ parameters.dockerapppath }}

I’m setting the image name with a combination of both passed parameter and sourcebranch. This guarantees that new images will always be created on any source branch you’re working on.

The Complete YAML:

name: $(Build.DefinitionName)_$(Build.SourceBranchName)_$(Date:yyyyMMdd)$(Rev:.r)

trigger:
# branch triggers. Commenting out to trigger builds on all branches
  branches:
    include:
    - master
    - develop
    - feature*
  paths:
    include:
    - AzureDevOpsBuildEvents/*
    - AzureDevOpsBuildEvents.Tests/*
    - azure-pipelines-buildevents.yml

variables: 
  - group: DockerInfo

resources:
  repositories:
  - repository: templates  # identifier (A-Z, a-z, 0-9, and underscore)
    type: git  # see below git - azure devops
    name: SoftwareTransformation/DevOps  # Teamproject/repositoryname (format depends on `type`)
    ref: refs/heads/master # ref name to use, defaults to 'refs/heads/master'

jobs:
- job: AppBuild
  pool:
      name: 'Hosted VS2017' # Valid Values: 'OnPremAgents' - Hosted:'Hosted VS2017',  'Hosted macOS', 'Hosted Ubuntu 1604'
  steps:
  - template: YAML/Builds/DotNetCoreBuildAndPublish.yml@templates  # Template reference
    parameters:
      Name: 'WebHooksBuildEventsWindowsBuild' # 'Ubuntu 16.04' NOTE: Code Coverage doesn't work on Linux Hosted Agents. Bummer. 
      BuildConfiguration: 'Debug'
      ProjectFile: ' ./AzureDevOpsBuildEvents/AzureDevOpsBuildEvents.csproj'  

- job: QualityCheck
  pool:
      name: 'Hosted VS2017' # Valid Values: 'OnPremAgents' - Hosted:'Hosted VS2017',  'Hosted macOS', 'Hosted Ubuntu 1604'
  steps:
  - template: YAML/Builds/DotNetCoreQualitySteps.yml@templates  # Template reference
    parameters:
      Name: 'WebHooksQualityChecks' # 'Ubuntu 16.04' NOTE: Code Coverage doesn't work on Linux Hosted Agents. Bummer. 
      BuildConfiguration: 'Debug'
      TestProjectFile: ' ./AzureDevOpsBuildEvents.Tests/AzureDevOpsBuildEvents.Tests.csproj'
      CoverageThreshold: '10'
  
- job: DockerBuild
  pool:
      vmImage: 'Ubuntu 16.04' # other options: 'macOS-10.13', 'vs2017-win2016'. 'Ubuntu 16.04' 
  dependsOn: QualityCheck
  condition: succeeded('QualityCheck')
  steps:
  - template: YAML/Builds/DockerBuildAndPublish.yml@templates  # Template reference
    parameters:
      Name: "WebHooksBuildEventsLinux"
      dockerimagename: 'webhooksbuildeventslinux'
      dockeridacr: $(DockerAdmin) #ACR Admin User
      dockerpasswordacr: $(DockerACRPassword) #ACR Admin Password
      dockeracr: 'azuredevopssandbox'
      dockerapppath: ' ./AzureDevOpsBuildEvents'
      dockerfile: './AzureDevOpsBuildEvents/DockerFile'

The above YAML runs is the entire build pipeline comprised of all jobs that calls each YAML templates. There are 2 sections that I do want to point out:

Resources: This is the part where I refer to the YAML templates stored in a different Git Repo instance within Azure DevOps

resources:
  repositories:
  - repository: templates  # identifier (A-Z, a-z, 0-9, and underscore)
    type: git  # see below git - azure devops
    name: SoftwareTransformation/DevOps  # Teamproject/repositoryname (format depends on `type`)
    ref: refs/heads/master # ref name to use, defaults to 'refs/heads/master'

Variables:  This is the section where I use Azure DevOps pipeline group variables to encrypt docker login information. For more information on this, see: Variable groups

variables: 
  - group: DockerInfo

The end results. A working pipeline that triggers builds from code that works in your branching strategy of choice. This greatly speeds up the development process without the worry of maintaining manually created build definitions.

Continuous Integration in VSTS using .Net Core (with Code Coverage), NUnit, SonarQube: Part 1: .Net Core Project Setup – Code Coverage

There are 2 ways to discover and execute unit tests using Microsoft developed test harnesses:

  • Vstest.console.exe = This is the command-line used to execute tests within/embedded in Visual Studio IDE
  • Dotnet.exe = This is the command line interface (CLI) specific to .Net Core Projects

Documentation for Vstest.console.exe is documented here: https://msdn.microsoft.com/en-us/library/jj155796.aspx

For .Net Core Projects: https://docs.microsoft.com/en-us/dotnet/core/tools/dotnet-test?tabs=netcore2x

The primary difference between both is that vstest.console.exe can execute tests developed in .Net Framework and .Net Core while dotnet.exe is specifically for .Net Core

An example of executing tests for the same assembly domain (test project) would be:

VSTest.Console.exe:

vstest.console.exe <testassembly>.dll (Pointer to the compiled Assembly)

Dotnet.exe:

dotnet test <testassemblyproject>.csproj (Pointer to the actual .Net Core Test Project)

The issue with dotnet.exe (CLI) is that Code Coverage doesn’t work. In order for code coverage to work on .Net Core projects, you need to:

  1. Edit the .Net Core projects you want to instrument for code coverage
  2. Use vstest.console.exe and supply /EnableCodeCoverage switch

Edit the .Net Core project/s for code coverage instrumentation

When you run unit tests in visual studio and select the option to “Analyze Code Coverage for Selected Tests” (as seen below), by default, code coverage results will not be captured.

image

As of writing of this post, the fix is to modify the project file and enable DebugType to Full on the propertygroup section of the project file.

image

Save the project file and run the unit tests again by selecting the option: to “Analyze Code Coverage for Selected Tests” and you’ll see similar results as shown below.

image

Use vstest.console.exe and supply /EnableCodeCoverage switch

As you saw within Visual Studio, running tests with code coverage can be trigged via a simple click on the context menu. If you want to execute your unit test with code coverage in a command line, you invoke /EnableCodeCoverage switch.

vstest.console.exe <testassembly>.dll /EnableCodeCoverage

The result would be an export of the code coverage results to a .coverage file. You can then open the file within Visual Studio to inspect the results. See screenshot below:

image

Setting up your .Net Core projects appropriately using the preceding steps should give you the proper code coverage numbers. More importantly, this allows you to seamlessly integrate with various build systems. Additionally, here are some tips and practices around code coverage:

Use a test .runsettings

Use a test .runsettings file to exclude assemblies you don’t want to instrument. The .runsettings file can be used on how tests are executed from vstest.console.exe. For more information, see the following: Configure unit tests by using a .runsettings file

Here an example on how you would want to exclude piece of code not to be measured for code coverage:

<DataCollectionRunSettings>
    <DataCollectors>
      <DataCollector friendlyName="Code Coverage" uri="datacollector://Microsoft/CodeCoverage/2.0" assemblyQualifiedName="Microsoft.VisualStudio.Coverage.DynamicCoverageDataCollector, Microsoft.VisualStudio.TraceCollector, Version=11.0.0.0, Culture=neutral, PublicKeyToken=b03f5f7f11d50a3a">
        <Configuration>
          <CodeCoverage>
            <ModulePaths>
              <Include>  
                <!-- Include all loaded .dll assemblies -->  
              </Include> 
              <Exclude>
                <!-- Exclude all loaded .dll assemblies with the words moq, essentially regex -->
                <ModulePath>.*\\[^\\]*moq[^\\]*\.dll</ModulePath>
                <ModulePath>.*\\[^\\]*Moq[^\\]*\.dll</ModulePath>
              </Exclude>
            </ModulePaths>
            <!-- We recommend you do not change the following values: -->
            <UseVerifiableInstrumentation>True</UseVerifiableInstrumentation>
            <AllowLowIntegrityProcesses>True</AllowLowIntegrityProcesses>
            <CollectFromChildProcesses>True</CollectFromChildProcesses>
            <CollectAspDotNet>False</CollectAspDotNet>s
            <Attributes>
              <Exclude>
                <Attribute>^System.Diagnostics.CodeAnalysis.ExcludeFromCodeCoverageAttribute$</Attribute>
              </Exclude>
            </Attributes>
          </CodeCoverage>
        </Configuration>
      </DataCollector>
    </DataCollectors>
  </DataCollectionRunSettings>

To use the .runsettings file, in Visual Studio, click on Test, Test Settings, Select Test Settings File (see below image)

SNAGHTML2d4683

[ExcludeFromCodeCoverage] attribute

Use [ExcludeFromCodeCoverage] attribute wherever appropriate. When a section of code is decorated with this attribute, that section of the code will be skipped for code coverage. Why? In certain cases, you don’t want code to be measured with code coverage. An example would be entity objects that have default property setters (get / set) that has no functionality. If there is “NO” logic developed on either the get and/or set property why measure it?

This ends the first part of this series, on the next part (VSTS Build Definition Setup – .Net Core and NUnit), we will hook up the test tasks in VSTS to include code coverage reporting.

Working With Stand Alone Entity Framework Core 2.0 in .Net Framework 4.6 (above) with SQL Server

When you work with EF Core, the initial project creation requires that you select a .Net Core project. This is all good if you’re entirely working with a .Net Core App. What about .Net Frameworks 4.6 and above? How about starting with a .Net Core app without EF Core?  There are multiple guides out there, scattered in multiple places to get EF Core installed and working. This post is intended to have you install EF Core at minimum and walk through the setup and unit testing scenarios.

As of this post, we’re utilizing Entity Framework 2.0 within .Net Framework 4.7 projects. Entity Framework Core 2.0 is compatible with versions of .Net Framework 4.6.x and above. Why use EF Core on .Net Framework projects? Simply put, compatibility reasons. Certain services in azure (Azure Functions for example) currently supports .Net Framework projects and not .Net Core. To circumvent the problem, the EF team has done a great job with EF Core so it can work with various .Net versions. While the intention of this post is adopting EF Core 2.0 within .Net 4.7, the goal is to show the features built in EF Core 2.0. In particular, I really love the capability to unit test databases through in memory channel. We’ll talk about this later.

If this is your first time working through Entity Framework, I strongly suggest going through the “Get Started Guide”, see the following article from Microsoft: https://docs.microsoft.com/en-us/ef/core/get-started/

Let’s get started: Create a .Net 4.7 Project

In Visual Studio, create a new project:

EF1

Install the following Nuget Packages for EF Core:

Microsoft.EntityFrameworkCore – Core EF libraries

Microsoft.EntityFrameworkCore.Design – The .NET Core CLI tools for EF Core

Microsoft.EntityFrameworkCore.SqlServer – EF Core Database Provider for SQL. In this case, we’ll be using SQL EF Core Provider

Microsoft.EntityFrameworkCore.Relational– EF Core Libraries that allows EF to be used to access many different databases. Some concepts are common to most databases, and are included in the primary EF Core components. Such concepts include expressing queries in LINQ, transactions, and tacking changes to objects once they are loaded from the database. NOTE: If you install Microsoft.EntityFrameworkCore.SqlServer, this will automatically install the Relational assemblies

Microsoft.EntityFrameworkCore.Tools – EF Core tools to create a model from the database

Microsoft.EntityFrameworkCore.SqlServer.Design– EF Core tools for SQL server

Microsoft.EntityFrameworkCore.InMemory – EF Core In-memory database provider for Entity Framework Core (to be used for testing purposes). This is or will be your best friend! One of the reasons why I switched to EF Core (besides it’s other cool features). You only need to install this package if you’re doing Unit Testing (which you should!)

Edit the Project Files:

Edit the project file and make sure the following entry appears in the initial property group.

<PropertyGroup> 
<AutoGenerateBindingRedirects>true</AutoGenerateBindingRedirects>
</PropertyGroup>

For test projects, also make sure the following entry is also present:

<GenerateBindingRedirectsOutputType>true</GenerateBindingRedirectsOutputType>

Implementing EF Core

I’m not going to go through the basics of EF Core. I’ll skip the entire overview and just dive deep on implementing EF entities and using the toolsets.

The Model and DBContext:
We’ll be using a simple model and context class here.

public class Employee
    {
        [Key]
        public int EmployeeId { get; set; }
        public string FirstName { get; set; }
        public string LastName { get; set; }
        public string DisplayName => FirstName + " " + LastName;
        public EmployeeType EmployeeType { get; set; }
    }

    public class EmployeeType
    {
        [Key]
        public int EmployeeTypeId { get; set; }
        public string EmployeeTypeRole { get; set; }
    }

public class DbContextEfCore : DbContext
    {
        public DbContextEfCore(DbContextOptions<DbContextEfCore> options) : base(options) { }

        public virtual DbSet<Employee> Employees { get; set; }
        public virtual DbSet<EmployeeType> EmployeeTypes { get; set; }

        protected override void OnConfiguring(DbContextOptionsBuilder optionsBuilder)
        {
            //When creating an instance of the DbContext, you use this check to ensure that if you're not passing any Db Options to always use SQL. 
            if (!optionsBuilder.IsConfigured)
            {
                var connectingstring = ConfigurationManager.ConnectionStrings["SqlConnectionString"].ConnectionString;
                optionsBuilder.UseSqlServer(connectingstring);
            }
        }
    }


EF Tools

Database Migrations – This is far one of the best database upgrade tools that you can use for SQL server. Since we have our model and DBContext, let’s create the scripts to eventually create the database on any target server and update the database when necessary
Before you run any Database Migration commands, you’ll need to ensure that you have a class file that implements IDesignTimeDbContextFactory. This class will be recognized and used by entity framework to provide command line tooling such as code generation and database migrations. Before proceeding, make sure your application or web.config file has the connectingstring values set for your SQL server (see example below)

  <connectionStrings>
    <add name="SqlConnectionString" connectionString="Server=XXXX;Database=XXX;User ID=XXX;Password=XXX;Trusted_Connection=False;Encrypt=True;Connection Timeout=30;" providerName="System.Data.SqlClient"/>
  </connectionStrings>

NOTE: Unfortunately, you cannot use InMemory Database when working with Database Migration Tools. In Memory Database doesn’t use a relational provider.

Here’s an example class file that you can use in your project:

public class DesignTimeDbContextFactory : IDesignTimeDbContextFactory<DbContextEfCore>
    {
        public DbContextEfCore CreateDbContext(string[] args)
        {
            var builder = new DbContextOptionsBuilder<DbContextEfCore>();
            //Database Migrations must use a relational provider. Microsoft.EntityFrameworkCore.InMemory is not a Relational provider and therefore cannot be use with Migrations.
            //builder.UseInMemoryDatabase("EmployeeDB");
            //You can point to use SQLExpress on your local machine
            var connectionstring = ConfigurationManager.ConnectionStrings["SqlConnectionString"].ConnectionString;
            builder.UseSqlServer(connectionstring);
            return new DbContextEfCore(builder.Options);
        }
    }


When running command line options, make sure you select the .Net Project where you are working on Entity Framework. At the same time, ensure that the default start-up project in solution explorer is set on the EF project

In Visual Studio. Go to Tools > Nuget Package Manager > Package Manager Console

In the PMC (Package Manager Console) type: Add-Migration InitialCreate

After running, this command, notice that it will create the proper class files for you to create the initial database schema.
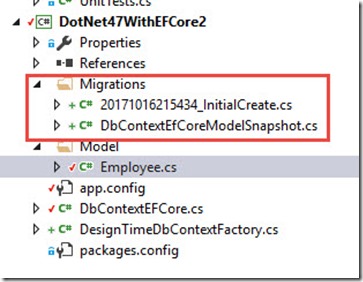
EF2

Let’s create our database on the target server. For this, run: update-database. When done, you should see the following:

EF3

Your database has been created as well:
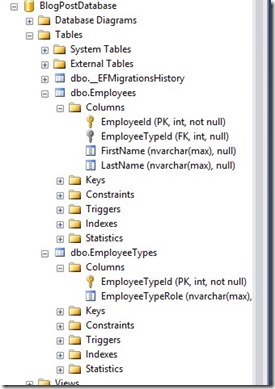
EF4

As we all know, requirements do change more often than before (specially in agile environments), a request was made to add the city and zip code to the employee data. This is easy as:

  • Modifying the entity (model)
  • Running “Add-Migration <ChangeSet>”
  • Running “Update-Database”

The Entity Change:

public class Employee
    {
        [Key]
        public int EmployeeId { get; set; }

        public string FirstName { get; set; }

        public string LastName { get; set; }

        public string DisplayName => FirstName + " " + LastName;

        public string City { get; set; }

        public int ZipCode { get; set; }

        public EmployeeType EmployeeType { get; set; }
    }

In the PMC (Package Manager Console) type: Add-Migration AddCityAndZipCodeToEmployee

New file has been created:

EF5

Schema has been added as well:

EF6

In the PMC (Package Manager Console) type: Update-Database

EF7

Changes have been applied to the database directly.
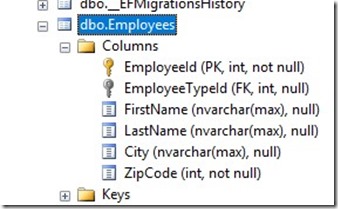
EF8

I’ll leave database migrations here. You can get more information on all the nice and nifty features of database migrations here: https://msdn.microsoft.com/en-us/library/jj554735(v=vs.113).aspx

For all command line options for database migrations: https://docs.microsoft.com/en-us/ef/core/miscellaneous/cli/powershell

Finally, Database Migrations uses the __MigrationsHistory table to store what migrations have been applied to the database.

Testing EF Core

This is my favorite topic! I can’t stress enough how easy it is to Unit Test databases using EF Core. InMemory Database as part of EF Core sets up the runtime and everything else you need to Unit Test databases. Before EF Core, it really took sometime to setup mock objects, fakes, dependencies, etc… With EF Core InMemory Database, I was able to focus more on the design of the database rather spend time focusing on the test harness. The short story is this, InMemory database is another provider in EF that stores data In Memory during runtime. Meaning, you get all the same benefits, features and functions with EF to SQL (or other provider) except with the beauty of not connecting to an actual provider endpoint (SQL in this case).

Start of by adding a new .Net Framework 4.7 Test Project

EF9

Add a reference to the previously created project with EF Core Enabled.

Add the following nuget packages:

  • Microsoft.EntityFrameworkCore
  • Microsoft.EntityFrameworkCore.InMemory
  • Microsoft.EntityFrameworkCore.SqlServer

Edit the project file and make sure the following entry appears in the initial property group.

<PropertyGroup>
<AutoGenerateBindingRedirects>true</AutoGenerateBindingRedirects>
<GenerateBindingRedirectsOutputType>true</GenerateBindingRedirectsOutputType>
</PropertyGroup>

Test Class:

[TestClass]
    public class DbContextTests
    {
        protected DbContextOptions<DbContextEfCore> Dboptionscontext;

        [TestInitialize]
        public void TestInitialize()
        {
            //This is where you use InMemory Provider for working with Unit Tests
            //Unlike before, we're you'll need to work with Mocks such as MOQ or RhinoMocks, you can use InMemory Provider
            Dboptionscontext = new DbContextOptionsBuilder<DbContextEfCore>().UseInMemoryDatabase("EmployeeDatabaseInMemoery").Options;

            //Lets switch to use Sql Server
            //var connectionstring = ConfigurationManager.ConnectionStrings["SqlConnectionString"].ConnectionString;
            //Dboptionscontext = new DbContextOptionsBuilder<DbContextEfCore>().UseSqlServer(connectionstring).Options;
        }

        [TestMethod]
        public void ValidateInsertNewEmployeeRecord()
        {
            //Employee Entity Setup
            var employee = new Employee
            {
                FirstName = "Don",
                LastName = "Tan",
                City = "Seattle",
                ZipCode = 98023,
                EmployeeType = new EmployeeType
                {
                    EmployeeTypeRole = "HR"

                }
            };

            using (var dbcontext = new DbContextEfCore(Dboptionscontext))
            {
                dbcontext.Employees.Add(employee);
                dbcontext.SaveChanges();
                Assert.IsTrue(dbcontext.Employees.Any());
            }
        }
    }

Test Initialize method is where I set the DBContext option to use InMemory vs SQL providers. When you run the tests switching either InMemory or SQL DBContext options, both tests run successfully.

Switching to Sql EF Core provider, stores the data to the DB directly:

EF10

Using InMemory provider for EF Core lets you focus unit testing your database more efficiently. This is definitely useful when working with multiple tables and each table has multiple relationships (keys and other constraints). More importantly, this lets you focus designing the appropriate DB strategies such as repository or unit of work patterns.